When examining their photos closely, almost every photographer has come across a situation in which a colored halo (usually purple, green or red) is apparent around certain elements of a scene. This sort of optic anomaly, more commonly known as color fringing, is known as chromatic aberration. In this article we'll understand its causes and learn ways to easily avoid it both while shooting and in post-production.
Quick Nav:
What is chromatic aberration?
Chromatic aberration is an optical phenomenon in which the camera lens is unable to focus the different wavelengths of light on the same plane (in this case the image sensor) in order to produce a correct image, resulting in a halo or fringe around objects.This is especially noticeable in high contrast situations and when shooting at wide apertures. Such a situation is presented below, where the hands of a statue were shot against a bright sky, resulting in a bad case of purple fringing.
It should be noted that color fringes may also be caused by other factors such as lens flare or the camera's sensitivity to the different wavelengths of light but since chromatic aberration is the most common cause it will be the main subject of this article.
I’m no Einstein!
I should state that I am a photographer, not a physicist, so some parts of this article may not be entirely correct from a scientific point of view but I believe they're helpful constructs to understand these concepts. With that being said, let's get started. :)The (somewhat) simple physics
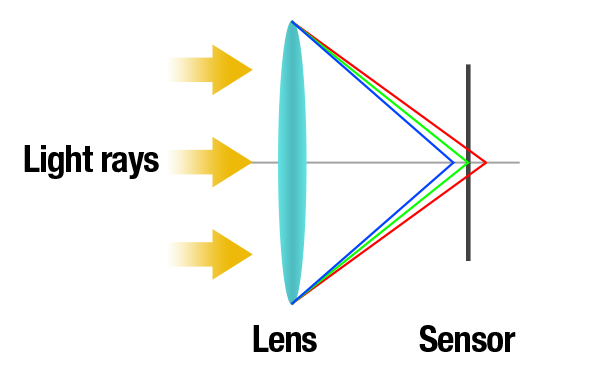
As you might imagine, DSLR lenses are a complex piece of equipment but for the sake of simplicity, let's consider them as a single piece of glass.When light hits the lens it is refracted, ie, it changes direction. As most people probably know just by looking at the rainbow, visible light is comprised of different wavelengths which are perceived as different colors. What happens in this situation is that the different wavelengths are bent differently by the lens, causing them to diverge (a phenomenon known as dispersion) and hit different planes, as shown in the following diagram:

Go to the corner!
Chromatic aberration is usually more or less controlled in the center of the frame. It’s at the image corners that it is more troublesome.Camera lenses and chromatic aberrations
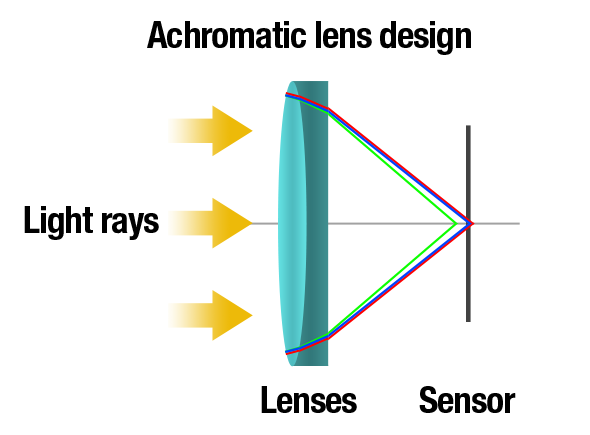
In order to correct this problem, lens makers came up with ways to minimize the divergence of light waves. The cheapest solution is usually used in consumer level optics like the common 18-55mm kit lenses and is known as an achromatic lens design. It uses a second lens that has a different dispersion than the main lens and tries to converge the light rays in order to try to correct both spherical and chromatic aberrations that light suffers when passing through the first lens. However, this isn't a perfect process and small imperfections are still present.
A simplified diagram demonstrating how achromatic lenses work

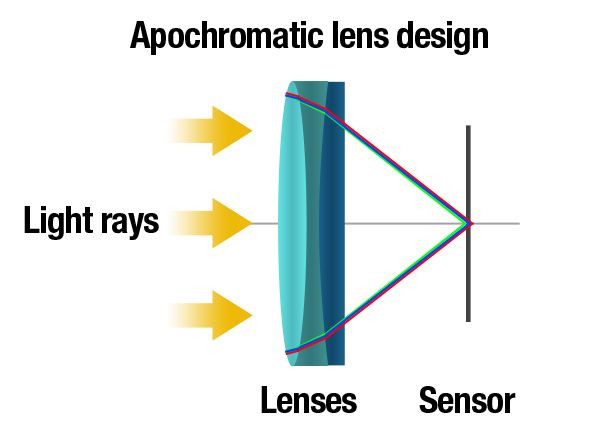
A simplified diagram demonstrating how apochromatic lenses work
How to avoid it on the field
Avoid high contrast situations
This might seem like a no-brainer but it really helps to downplay the optic design imperfections, especially if using consumer level lenses like most of us do. Common suspects include fences, tree branches and shooting a subject against a bright sunny sky.Stop down your aperture
While it is very tempting to use a wide aperture to get nice bokeh, if you get some fringing try to stop down the aperture at least one stop. This will greatly help minimize the visible aberrations.Avoid the extremes of your zoom lens
Not only in life but also in photographic lenses it is said that virtue is in the middle. Zoom lenses usually perform better when using its middle focal lengths. For example, when using a 70-200mm zoom, shooting at 135mm will usually wield better results than at 200mm.Avoid super zoom lenses
Unless you don't want to carry extra weight, like when going on vacations, avoid super zooms at all costs. They have terrible chromatic aberrations on the wide end. Alternatively, get some prime lenses, as they are generally optimized to reduce these optical artifacts and are relatively cheaper and lighter.How to correct it in Photoshop
After opening your image in Photoshop, go to Filter -> Distort -> Lens Correction…

On the right side panel you should find a set of controls named Chromatic Aberration.

You might have to move only one or both sliders: it all depends on the image you’re dealing with. In this case, I had to move both.

Don’t crop just yet!
If you recall from earlier on, chromatic aberration is more prevalent on corners. Photoshop’s algorithm takes this into account so make sure you are editing the image in its original aspect ratio or else you’ll get weird results in some areas of the image. Correct first the aberrations and you can always crop later.The Before and After Using Photoshop


0 comments:
Post a Comment